1
2
3
4
5
6
7
8
9
10
11
12
13
14
15
16
17
18
19
20
21
22
23
24
25
26
27
28
29
30
31
32
33
34
35
36
37
38
39
40
41
42
43
44
45
46
47
48
49
50
51
52
53
54
55
56
57
58
59
60
61
62
63
64
65
66
67
68
69
70
71
72
73
74
75
76
77
78
79
80
81
82
83
84
85
86
87
88
89
90
91
92
93
94
95
96
97
98
99
100
101
102
103
104
105
106
107
108
109
110
111
112
113
114
115
116
117
118
119
120
121
122
123
124
125
126
127
128
129
130
131
132
133
134
135
136
137
138
139
140
141
142
143
144
145
146
147
148
149
150
151
152
153
154
155
156
157
158
159
160
161
162
163
164
165
166
167
168
169
170
171
172
173
174
175
176
177
178
179
180
181
182
183
184
185
186
187
188
189
190
191
192
193
194
195
196
197
198
199
200
201
202
203
204
205
206
207
208
209
210
211
212
213
214
215
216
217
218
219
220
221
222
223
224
225
226
227
228
229
230
231
232
233
234
235
236
237
238
239
240
241
242
243
244
245
246
247
248
249
250
251
252
253
254
255
256
257
258
259
260
261
262
263
264
265
266
267
268
269
270
271
272
273
274
275
276
277
278
279
280
281
282
283
284
285
286
287
288
289
290
291
292
293
294
295
296
297
298
299
300
301
302
303
304
305
306
307
308
309
310
311
312
313
314
315
316
317
318
319
320
321
322
323
324
325
326
327
328
329
330
331
332
333
334
335
336
337
338
339
340
341
342
343
344
345
346
347
348
349
350
351
352
353
354
355
356
357
358
359
360
361
362
363
364
365
366
367
368
369
370
371
372
373
374
375
376
377
378
379
380
381
382
383
384
385
386
387
388
389
390
391
392
393
394
395
396
397
398
399
400
401
402
403
404
405
406
407
408
409
410
411
412
413
414
415
416
417
418
419
420
421
422
423
424
425
426
427
428
429
430
431
432
433
434
435
436
437
438
439
440
441
442
443
444
445
446
447
448
449
450
451
452
453
454
455
456
457
458
459
460
461
462
463
464
465
466
467
468
469
470
471
472
473
474
475
476
477
478
479
480
481
482
483
484
485
486
487
488
489
490
491
492
493
494
495
496
497
498
499
500
501
502
503
504
505
506
507
508
509
510
511
512
513
514
515
516
517
518
519
520
521
522
523
524
525
526
527
528
529
530
531
532
533
534
535
536
537
538
539
540
541
542
543
544
545
546
547
548
549
550
551
552
553
554
555
556
557
558
559
560
561
562
563
564
565
566
567
568
569
570
571
572
573
574
575
576
577
578
579
580
581
582
583
584
585
586
587
588
589
590
591
592
593
594
595
596
597
598
599
600
601
602
603
604
605
606
607
608
609
610
611
612
613
614
615
616
617
618
619
620
621
622
623
624
625
626
627
628
629
630
631
632
633
634
635
636
637
638
639
640
641
642
643
644
645
646
647
648
649
650
651
652
653
654
655
656
657
658
659
660
661
662
663
664
665
666
667
668
669
670
671
672
673
674
675
676
677
678
679
680
681
682
683
684
685
686
687
688
689
690
691
692
693
694
695
696
697
698
699
700
701
702
703
704
705
706
707
708
709
710
711
712
713
714
715
716
717
718
719
720
721
722
723
724
725
726
727
728
729
730
731
732
733
734
735
736
737
738
739
740
741
742
743
744
745
746
747
748
749
750
751
752
753
754
755
756
757
758
759
760
761
762
763
764
765
766
767
768
769
770
771
772
773
774
775
776
777
778
779
780
781
782
783
784
785
786
787
788
789
790
791
792
793
794
795
796
797
798
799
800
801
802
803
804
805
806
807
808
809
810
811
812
813
|
# Guix Installation and Setup
This only needs to be done once per machine. If you have already completed the
installation and setup, please proceed to [perform a build](./README.md).
Otherwise, you may choose from one of the following options to install Guix:
1. Using the official **shell installer script** [⤓ skip to section][install-script]
- Maintained by Guix developers
- Easiest (automatically performs *most* setup)
- Works on nearly all Linux distributions
- Only installs latest release
- Binary installation only, requires high level of trust
- Note: The script needs to be run as root, so it should be inspected before it's run
2. Using the official **binary tarball** [⤓ skip to section][install-bin-tarball]
- Maintained by Guix developers
- Normal difficulty (full manual setup required)
- Works on nearly all Linux distributions
- Installs any release
- Binary installation only, requires high level of trust
3. Using fanquake's **Docker image** [↗︎ external instructions][install-fanquake-docker]
- Maintained by fanquake
- Easy (automatically performs *some* setup)
- Works wherever Docker images work
- Installs any release
- Binary installation only, requires high level of trust
4. Using a **distribution-maintained package** [⤓ skip to section][install-distro-pkg]
- Maintained by distribution's Guix package maintainer
- Normal difficulty (manual setup required)
- Works only on distributions with Guix packaged, see: https://repology.org/project/guix/versions
- Installs a release decided on by package maintainer
- Source or binary installation depending on the distribution
5. Building **from source** [⤓ skip to section][install-source]
- Maintained by you
- Hard, but rewarding
- Can be made to work on most Linux distributions
- Installs any commit (more granular)
- Source installation, requires lower level of trust
## Options 1 and 2: Using the official shell installer script or binary tarball
The installation instructions for both the official shell installer script and
the binary tarballs can be found in the GNU Guix Manual's [Binary Installation
section](https://guix.gnu.org/manual/en/html_node/Binary-Installation.html).
Note that running through the binary tarball installation steps is largely
equivalent to manually performing what the shell installer script does.
Note that at the time of writing (July 5th, 2021), the shell installer script
automatically creates an `/etc/profile.d` entry which the binary tarball
installation instructions do not ask you to create. However, you will likely
need this entry for better desktop integration. Please see [this
section](#add-an-etcprofiled-entry) for instructions on how to add a
`/etc/profile.d/guix.sh` entry.
Regardless of which installation option you chose, the changes to
`/etc/profile.d` will not take effect until the next shell or desktop session,
so you should log out and log back in.
## Option 3: Using fanquake's Docker image
Please refer to fanquake's instructions
[here](https://github.com/fanquake/core-review/tree/master/guix).
Note that the `Dockerfile` is largely equivalent to running through the binary
tarball installation steps.
## Option 4: Using a distribution-maintained package
Note that this section is based on the distro packaging situation at the time of
writing (July 2021). Guix is expected to be more widely packaged over time. For
an up-to-date view on Guix's package status/version across distros, please see:
https://repology.org/project/guix/versions
### Debian 11 (Bullseye)/Ubuntu 21.04 (Hirsute Hippo)
Guix v1.2.0 is available as a distribution package starting in [Debian
11](https://packages.debian.org/bullseye/guix) and [Ubuntu
21.04](https://packages.ubuntu.com/hirsute/guix).
Note that if you intend on using Guix without using any substitutes (more
details [here][security-model]), v1.2.0 has a known problems when building
GnuTLS from source. Solutions and workarounds are documented
[here](#gnutls-test-suite-fail-status-request-revoked).
To install:
```sh
sudo apt install guix
```
For up-to-date information on Debian and Ubuntu's release history:
- [Debian release history](https://www.debian.org/releases/)
- [Ubuntu release history](https://ubuntu.com/about/release-cycle)
### Arch Linux
Guix is available in the AUR as
[`guix`](https://aur.archlinux.org/packages/guix/), please follow the
installation instructions in the Arch Linux Wiki ([live
link](https://wiki.archlinux.org/index.php/Guix#AUR_Package_Installation),
[2021/03/30
permalink](https://wiki.archlinux.org/index.php?title=Guix&oldid=637559#AUR_Package_Installation))
to install Guix.
At the time of writing (2021/03/30), the `check` phase will fail if the path to
guix's build directory is longer than 36 characters due to an anachronistic
character limit on the shebang line. Since the `check` phase happens after the
`build` phase, which may take quite a long time, it is recommended that users
either:
1. Skip the `check` phase
- For `makepkg`: `makepkg --nocheck ...`
- For `yay`: `yay --mflags="--nocheck" ...`
- For `paru`: `paru --nocheck ...`
2. Or, check their build directory's length beforehand
- For those building with `makepkg`: `pwd | wc -c`
## Option 5: Building from source
Building Guix from source is a rather involved process but a rewarding one for
those looking to minimize trust and maximize customizability (e.g. building a
particular commit of Guix). Previous experience with using autotools-style build
systems to build packages from source will be helpful. *hic sunt dracones.*
I strongly urge you to at least skim through the entire section once before you
start issuing commands, as it will save you a lot of unncessary pain and
anguish.
### Installing common build tools
There are a few basic build tools that are required for most things we'll build,
so let's install them now:
Text transformation/i18n:
- `autopoint` (sometimes packaged in `gettext`)
- `help2man`
- `po4a`
- `texinfo`
Build system tools:
- `g++` w/ C++11 support
- `libtool`
- `autoconf`
- `automake`
- `pkg-config` (sometimes packaged as `pkgconf`)
- `make`
- `cmake`
Miscellaneous:
- `git`
- `gnupg`
- `python3`
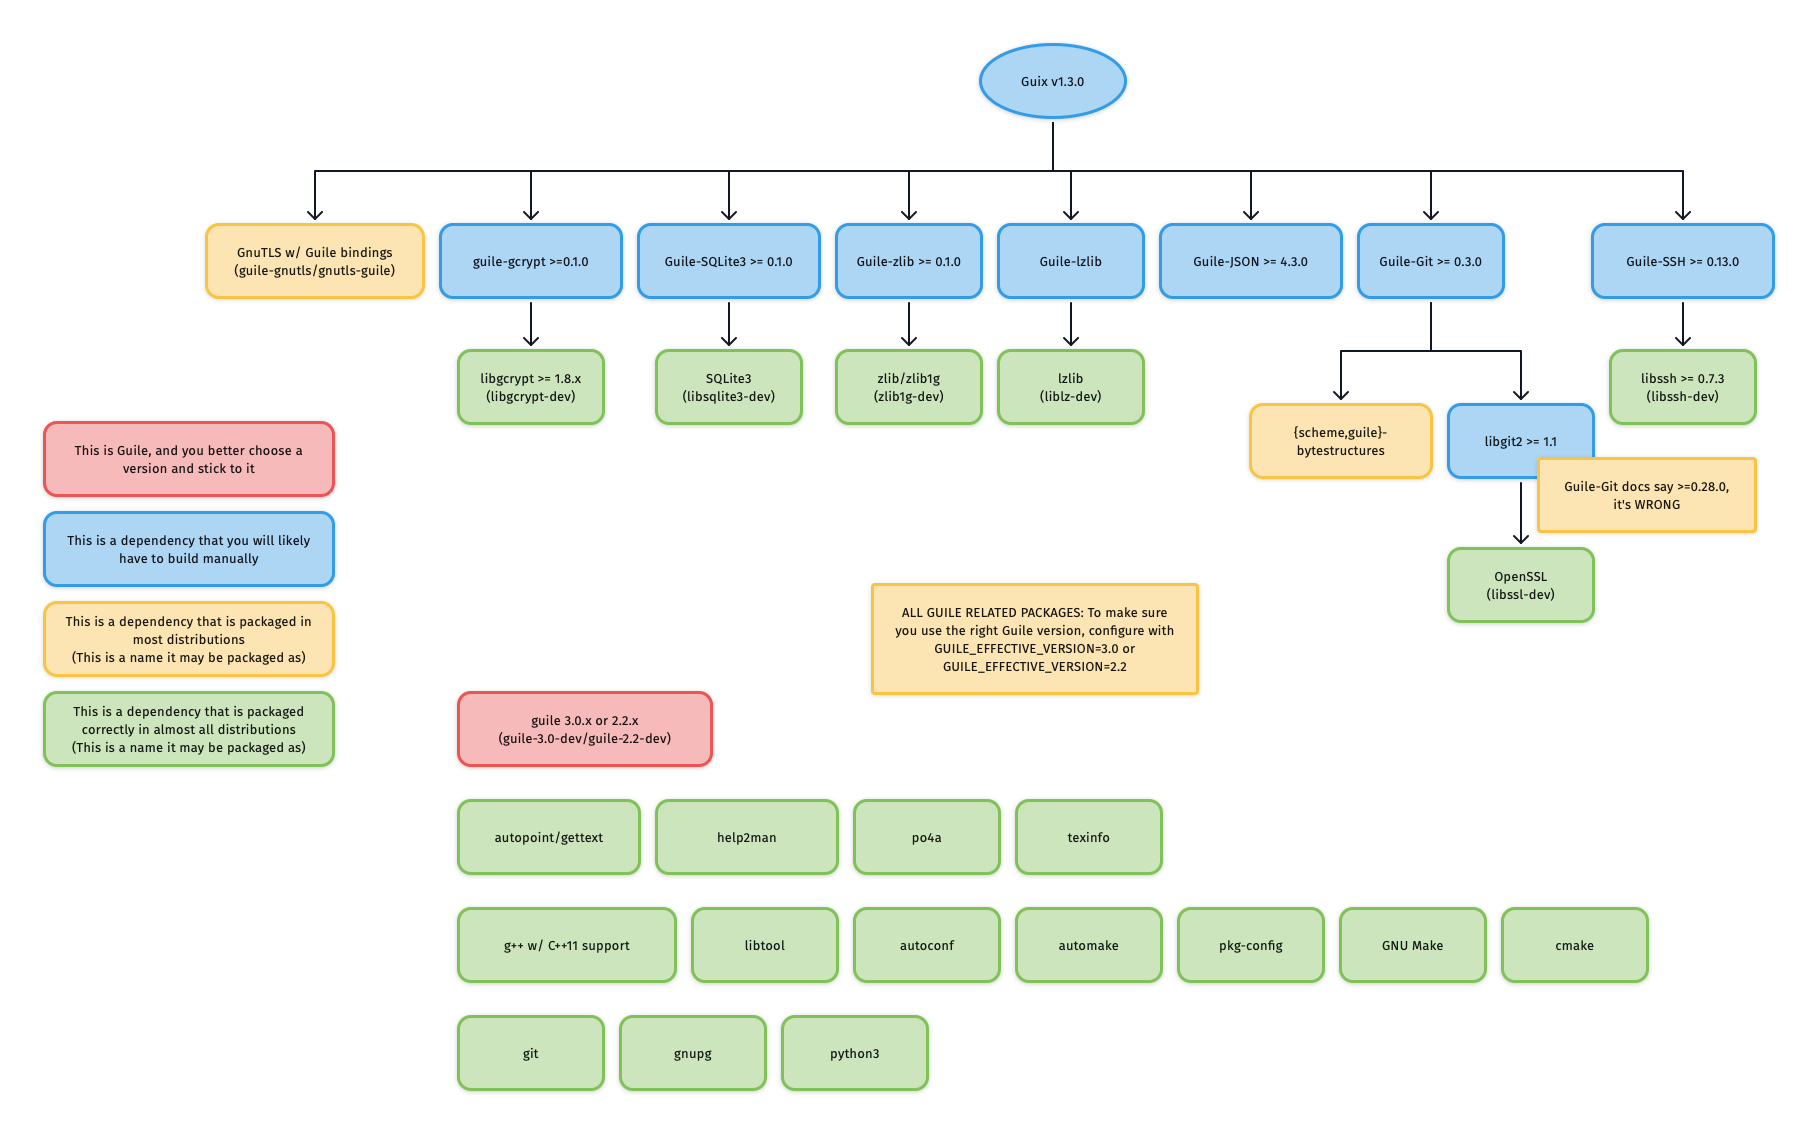
### Building and Installing Guix's dependencies
In order to build Guix itself from source, we need to first make sure that the
necessary dependencies are installed and discoverable. The most up-to-date list
of Guix's dependencies is kept in the ["Requirements"
section](https://guix.gnu.org/manual/en/html_node/Requirements.html) of the Guix
Reference Manual.
Depending on your distribution, most or all of these dependencies may already be
packaged and installable without manually building and installing.
For reference, the graphic below outlines Guix v1.3.0's dependency graph:
#### Guile
##### Choosing a Guile version and sticking to it
One of the first things you need to decide is which Guile version you want to
use: Guile v2.2 or Guile v3.0. Unlike the python2 to python3 transition, Guile
v2.2 and Guile v3.0 are largely compatible, as evidenced by the fact that most
Guile packages and even [Guix
itself](https://guix.gnu.org/en/blog/2020/guile-3-and-guix/) support running on
both.
What is important here is that you **choose one**, and you **remain consistent**
with your choice throughout **all Guile-related packages**, no matter if they
are installed via the distribution's package manager or installed from source.
This is because the files for Guile packages are installed to directories which
are separated based on the Guile version.
###### Example: Checking that Ubuntu's `guile-git` is compatible with your chosen Guile version
On Ubuntu Focal:
```sh
$ apt show guile-git
Package: guile-git
...
Depends: guile-2.2, guile-bytestructures, libgit2-dev
...
```
As you can see, the package `guile-git` depends on `guile-2.2`, meaning that it
was likely built for Guile v2.2. This means that if you decided to use Guile
v3.0 on Ubuntu Focal, you would need to build guile-git from source instead of
using the distribution package.
On Ubuntu Hirsute:
```sh
$ apt show guile-git
Package: guile-git
...
Depends: guile-3.0 | guile-2.2, guile-bytestructures (>= 1.0.7-3~), libgit2-dev (>= 1.0)
...
```
In this case, `guile-git` depends on either `guile-3.0` or `guile-2.2`, meaning
that it would work no matter what Guile version you decided to use.
###### Corner case: Multiple versions of Guile on one system
It is recommended to only install one version of Guile, so that build systems do
not get confused about which Guile to use.
However, if you insist on having both Guile v2.2 and Guile v3.0 installed on
your system, then you need to **consistently** specify one of
`GUILE_EFFECTIVE_VERSION=3.0` or `GUILE_EFFECTIVE_VERSION=2.2` to all
`./configure` invocations for Guix and its dependencies.
##### Installing Guile
Guile is most likely already packaged for your distribution, so after you have
[chosen a Guile version](#choosing-a-guile-version-and-sticking-to-it), install
it via your distribution's package manager.
If your distribution splits packages into `-dev`-suffixed and
non-`-dev`-suffixed sub-packages (as is the case for Debian-derived
distributions), please make sure to install both. For example, to install Guile
v2.2 on Debian/Ubuntu:
```sh
apt install guile-2.2 guile-2.2-dev
```
#### Mixing distribution packages and source-built packages
At the time of writing, most distributions have _some_ of Guix's dependencies
packaged, but not all. This means that you may want to install the distribution
package for some dependencies, and manually build-from-source for others.
Distribution packages usually install to `/usr`, which is different from the
default `./configure` prefix of source-built packages: `/usr/local`.
This means that if you mix-and-match distribution packages and source-built
packages and do not specify exactly `--prefix=/usr` to `./configure` for
source-built packages, you will need to augment the `GUILE_LOAD_PATH` and
`GUILE_LOAD_COMPILED_PATH` environment variables so that Guile will look
under the right prefix and find your source-built packages.
For example, if you are using Guile v2.2, and have Guile packages in the
`/usr/local` prefix, either add the following lines to your `.profile` or
`.bash_profile` so that the environment variable is properly set for all future
shell logins, or paste the lines into a POSIX-style shell to temporarily modify
the environment variables of your current shell session.
```sh
# Help Guile v2.2.x find packages in /usr/local
export GUILE_LOAD_PATH="/usr/local/share/guile/site/2.2${GUILE_LOAD_PATH:+:}$GUILE_LOAD_PATH"
export GUILE_LOAD_COMPILED_PATH="/usr/local/lib/guile/2.2/site-ccache${GUILE_LOAD_COMPILED_PATH:+:}$GUILE_COMPILED_LOAD_PATH"
```
Note that these environment variables are used to check for packages during
`./configure`, so they should be set as soon as possible should you want to use
a prefix other than `/usr`.
<!-- ##### Example: Consistently using Guile 3.0 on Ubuntu -->
<!-- For example, on Ubuntu, if you choose to use Guile 3.0 and install the -->
<!-- `guile-3.0` package, you want to make sure that if you also want to install the -->
<!-- `guile-git` package with `apt` that said `guile-git` package was built for Guile -->
<!-- v3.0. This can be checked by invoking the following: -->
<!-- ``` -->
<!-- apt update -->
<!-- apt show guile-git -->
<!-- ``` -->
#### Building and installing source-built packages
***IMPORTANT**: A few dependencies have non-obvious quirks/erratas which are documented in the
sub-sections immediately below. Please read these sections before proceeding to
build and install these packages.*
Although you should always refer to the README or INSTALL files for the most
accurate information, most of these dependencies use autoconf-style build
systems (check if there's a `configure.ac` file), and will likely do the right
thing with the following:
Clone the repository and check out the latest release:
```sh
git clone <git-repo-of-dependency>/<dependency>.git
cd <dependency>
git tag -l # check for the latest release
git checkout <latest-release>
```
For autoconf-based build systems (if `./autogen.sh` or `configure.ac` exists at
the root of the repository):
```sh
./autogen.sh || autoreconf -vfi
./configure --prefix=<prefix>
make
sudo make install
```
For CMake-based build systems (if `CMakeLists.txt` exists at the root of the
repository):
```sh
mkdir build && cd build
cmake .. -DCMAKE_INSTALL_PREFIX=<prefix>
sudo cmake --build . --target install
```
If you choose not to specify exactly `--prefix=/usr` to `./configure`, please
make sure you've carefully read the [previous section] on mixing distribution
packages and source-built packages.
##### Binding packages require `-dev`-suffixed packages
Relevant for:
- Everyone
When building bindings, the `-dev`-suffixed version of the original package
needs to be installed. For example, building `Guile-zlib` on Debian-derived
distributions requires that `zlib1g-dev` is installed.
When using bindings, the `-dev`-suffixed version of the original package still
needs to be installed. This is particularly problematic when distribution
packages are mispackaged like `guile-sqlite3` is in Ubuntu Focal such that
installing `guile-sqlite3` does not automatically install `libsqlite3-dev` as a
dependency.
Below is a list of relevant Guile bindings and their corresponding `-dev`
packages in Debian at the time of writing.
| Guile binding package | -dev Debian package |
|-----------------------|---------------------|
| guile-gcrypt | libgcrypt-dev |
| guile-git | libgit2-dev |
| guile-lzlib | liblz-dev |
| guile-ssh | libssh-dev |
| guile-sqlite3 | libsqlite3-dev |
| guile-zlib | zlib1g-dev |
##### `guile-git` actually depends on `libgit2 >= 1.1`
Relevant for:
- Those building `guile-git` from source against `libgit2 < 1.1`
- Those installing `guile-git` from their distribution where `guile-git` is
built against `libgit2 < 1.1`
As of v0.4.0, `guile-git` claims to only require `libgit2 >= 0.28.0`, however,
it actually requires `libgit2 >= 1.1`, otherwise, it will be confused by a
reference of `origin/keyring`: instead of interpreting the reference as "the
'keyring' branch of the 'origin' remote", the reference is interpreted as "the
branch literally named 'origin/keyring'"
This is especially notable because Ubuntu Focal packages `libgit2 v0.28.4`, and
`guile-git` is built against it.
Should you be in this situation, you need to build both `libgit2 v1.1.x` and
`guile-git` from source.
Source: http://logs.guix.gnu.org/guix/2020-11-12.log#232527
##### `{scheme,guile}-bytestructures` v1.0.8 and v1.0.9 are broken for Guile v2.2
Relevant for:
- Those building `{scheme,guile}-bytestructures` from source against Guile v2.2
Commit
[707eea3](https://github.com/TaylanUB/scheme-bytestructures/commit/707eea3a85e1e375e86702229ebf73d496377669)
introduced a regression for Guile v2.2 and was first included in v1.0.8, this
was later corrected in commit
[ec9a721](https://github.com/TaylanUB/scheme-bytestructures/commit/ec9a721957c17bcda13148f8faa5f06934431ff7)
and included in v1.1.0.
TL;DR If you decided to use Guile v2.2, do not use `{scheme,guile}-bytestructures` v1.0.8 or v1.0.9.
### Building and Installing Guix itself
Start by cloning Guix:
```
git clone https://git.savannah.gnu.org/git/guix.git
cd guix
```
You will likely want to build the latest release, however, if the latest release
when you're reading this is still 1.2.0 then you may want to use 95aca29 instead
to avoid a problem in the GnuTLS test suite.
```
git branch -a -l 'origin/version-*' # check for the latest release
git checkout <latest-release>
```
Bootstrap the build system:
```
./bootstrap
```
Configure with the recommended `--localstatedir` flag:
```
./configure --localstatedir=/var
```
Note: If you intend to hack on Guix in the future, you will need to supply the
same `--localstatedir=` flag for all future Guix `./configure` invocations. See
the last paragraph of this
[section](https://guix.gnu.org/manual/en/html_node/Requirements.html) for more
details.
Build Guix (this will take a while):
```
make -j$(nproc)
```
Install Guix:
```
sudo make install
```
### Post-"build from source" Setup
#### Creating and starting a `guix-daemon-original` service with a fixed `argv[0]`
At this point, guix will be installed to `${bindir}`, which is likely
`/usr/local/bin` if you did not override directory variables at
`./configure`-time. More information on standard Automake directory variables
can be found
[here](https://www.gnu.org/software/automake/manual/html_node/Standard-Directory-Variables.html).
However, the Guix init scripts and service configurations for Upstart, systemd,
SysV, and OpenRC are installed (in `${libdir}`) to launch
`${localstatedir}/guix/profiles/per-user/root/current-guix/bin/guix-daemon`,
which does not yet exist, and will only exist after [`root` performs their first
`guix pull`](#guix-pull-as-root).
We need to create a `-original` version of these init scripts that's pointed to
the binaries we just built and `make install`'ed in `${bindir}` (normally,
`/usr/local/bin`).
Example for `systemd`, run as `root`:
```sh
# Create guix-daemon-original.service by modifying guix-daemon.service
libdir=# set according to your PREFIX (default is /usr/local/lib)
bindir="$(dirname $(command -v guix-daemon))"
sed -E -e "s|/\S*/guix/profiles/per-user/root/current-guix/bin/guix-daemon|${bindir}/guix-daemon|" "${libdir}"/systemd/system/guix-daemon.service > /etc/systemd/system/guix-daemon-original.service
chmod 664 /etc/systemd/system/guix-daemon-original.service
# Make systemd recognize the new service
systemctl daemon-reload
# Make sure that the non-working guix-daemon.service is stopped and disabled
systemctl stop guix-daemon
systemctl disable guix-daemon
# Make sure that the working guix-daemon-original.service is started and enabled
systemctl enable guix-daemon-original
systemctl start guix-daemon-original
```
#### Creating `guix-daemon` users / groups
Please see the [relevant
section](https://guix.gnu.org/manual/en/html_node/Build-Environment-Setup.html)
in the Guix Reference Manual for more details.
## Optional setup
At this point, you are set up to [use Guix to build Bitcoin
Core](./README.md#usage). However, if you want to polish your setup a bit and
make it "what Guix intended", then read the next few subsections.
### Add an `/etc/profile.d` entry
This section definitely does not apply to you if you installed Guix using:
1. The shell installer script
2. fanquake's Docker image
3. Debian's `guix` package
#### Background
Although Guix knows how to update itself and its packages, it does so in a
non-invasive way (it does not modify `/usr/local/bin/guix`).
Instead, it does the following:
- After a `guix pull`, it updates
`/var/guix/profiles/per-user/$USER/current-guix`, and creates a symlink
targeting this directory at `$HOME/.config/guix/current`
- After a `guix install`, it updates
`/var/guix/profiles/per-user/$USER/guix-profile`, and creates a symlink
targeting this directory at `$HOME/.guix-profile`
Therefore, in order for these operations to affect your shell/desktop sessions
(and for the principle of least astonishment to hold), their corresponding
directories have to be added to well-known environment variables like `$PATH`,
`$INFOPATH`, `$XDG_DATA_DIRS`, etc.
In other words, if `$HOME/.config/guix/current/bin` does not exist in your
`$PATH`, a `guix pull` will have no effect on what `guix` you are using. Same
goes for `$HOME/.guix-profile/bin`, `guix install`, and installed packages.
Helpfully, after a `guix pull` or `guix install`, a message will be printed like
so:
```
hint: Consider setting the necessary environment variables by running:
GUIX_PROFILE="$HOME/.guix-profile"
. "$GUIX_PROFILE/etc/profile"
Alternately, see `guix package --search-paths -p "$HOME/.guix-profile"'.
```
However, this is somewhat tedious to do for both `guix pull` and `guix install`
for each user on the system that wants to properly use `guix`. I recommend that
you instead add an entry to `/etc/profile.d` instead. This is done by default
when installing the Debian package later than 1.2.0-4 and when using the shell
script installer.
#### Instructions
Create `/etc/profile.d/guix.sh` with the following content:
```sh
# _GUIX_PROFILE: `guix pull` profile
_GUIX_PROFILE="$HOME/.config/guix/current"
if [ -L $_GUIX_PROFILE ]; then
export PATH="$_GUIX_PROFILE/bin${PATH:+:}$PATH"
# Export INFOPATH so that the updated info pages can be found
# and read by both /usr/bin/info and/or $GUIX_PROFILE/bin/info
# When INFOPATH is unset, add a trailing colon so that Emacs
# searches 'Info-default-directory-list'.
export INFOPATH="$_GUIX_PROFILE/share/info:$INFOPATH"
fi
# GUIX_PROFILE: User's default profile
GUIX_PROFILE="$HOME/.guix-profile"
[ -L $GUIX_PROFILE ] || return
GUIX_LOCPATH="$GUIX_PROFILE/lib/locale"
export GUIX_PROFILE GUIX_LOCPATH
[ -f "$GUIX_PROFILE/etc/profile" ] && . "$GUIX_PROFILE/etc/profile"
# set XDG_DATA_DIRS to include Guix installations
export XDG_DATA_DIRS="$GUIX_PROFILE/share:${XDG_DATA_DIRS:-/usr/local/share/:/usr/share/}"
```
Please note that this will not take effect until the next shell or desktop
session (log out and log back in).
### `guix pull` as root
Before you do this, you need to read the section on [choosing your security
model][security-model] and adjust `guix` and `guix-daemon` flags according to
your choice, as invoking `guix pull` may pull substitutes from substitute
servers (which you may not want).
As mentioned in a previous section, Guix expects
`${localstatedir}/guix/profiles/per-user/root/current-guix` to be populated with
`root`'s Guix profile, `guix pull`-ed and built by some former version of Guix.
However, this is not the case when we build from source. Therefore, we need to
perform a `guix pull` as `root`:
```sh
sudo --login guix pull --branch=version-<latest-release-version>
# or
sudo --login guix pull --commit=<particular-commit>
```
`guix pull` is quite a long process (especially if you're using
`--no-substitute`). If you encounter build problems, please refer to the
[troubleshooting section](#troubleshooting).
Note that running a bare `guix pull` with no commit or branch specified will
pull the latest commit on Guix's master branch, which is likely fine, but not
recommended.
If you installed Guix from source, you may get an error like the following:
```sh
error: while creating symlink '/root/.config/guix/current' No such file or directory
```
To resolve this, simply:
```
sudo mkdir -p /root/.config/guix
```
Then try the `guix pull` command again.
After the `guix pull` finishes successfully,
`${localstatedir}/guix/profiles/per-user/root/current-guix` should be populated.
#### Using the newly-pulled `guix` by restarting the daemon
Depending on how you installed Guix, you should now make sure that your init
scripts and service configurations point to the newly-pulled `guix-daemon`.
##### If you built Guix from source
If you followed the instructions for [fixing argv\[0\]][fix-argv0], you can now
do the following:
```sh
systemctl stop guix-daemon-original
systemctl disable guix-daemon-original
systemctl enable guix-daemon
systemctl start guix-daemon
```
##### If you installed Guix via the Debian/Ubuntu distribution packages
You will need to create a `guix-daemon-latest` service which points to the new
`guix` rather than a pinned one.
```sh
# Create guix-daemon-latest.service by modifying guix-daemon.service
sed -E -e "s|/usr/bin/guix-daemon|/var/guix/profiles/per-user/root/current-guix/bin/guix-daemon|" /etc/systemd/system/guix-daemon.service > /lib/systemd/system/guix-daemon-latest.service
chmod 664 /lib/systemd/system/guix-daemon-latest.service
# Make systemd recognize the new service
systemctl daemon-reload
# Make sure that the old guix-daemon.service is stopped and disabled
systemctl stop guix-daemon
systemctl disable guix-daemon
# Make sure that the new guix-daemon-latest.service is started and enabled
systemctl enable guix-daemon-latest
systemctl start guix-daemon-latest
```
##### If you installed Guix via lantw44's Arch Linux AUR package
At the time of writing (July 5th, 2021) the systemd unit for "updated Guix" is
`guix-daemon-latest.service`, therefore, you should do the following:
```sh
systemctl stop guix-daemon
systemctl disable guix-daemon
systemctl enable guix-daemon-latest
systemctl start guix-daemon-latest
```
##### Otherwise...
Simply do:
```sh
systemctl restart guix-daemon
```
### Checking everything
If you followed all the steps above to make your Guix setup "prim and proper,"
you can check that you did everything properly by running through this
checklist.
1. `/etc/profile.d/guix.sh` should exist and be sourced at each shell login
2. `guix describe` should not print `guix describe: error: failed to determine
origin`, but rather something like:
```
Generation 38 Feb 22 2021 16:39:31 (current)
guix f350df4
repository URL: https://git.savannah.gnu.org/git/guix.git
branch: version-1.2.0
commit: f350df405fbcd5b9e27e6b6aa500da7f101f41e7
```
3. `guix-daemon` should be running from `${localstatedir}/guix/profiles/per-user/root/current-guix`
# Troubleshooting
## Derivation failed to build
When you see a build failure like below:
```
building /gnu/store/...-foo-3.6.12.drv...
/ 'check' phasenote: keeping build directory `/tmp/guix-build-foo-3.6.12.drv-0'
builder for `/gnu/store/...-foo-3.6.12.drv' failed with exit code 1
build of /gnu/store/...-foo-3.6.12.drv failed
View build log at '/var/log/guix/drvs/../...-foo-3.6.12.drv.bz2'.
cannot build derivation `/gnu/store/...-qux-7.69.1.drv': 1 dependencies couldn't be built
cannot build derivation `/gnu/store/...-bar-3.16.5.drv': 1 dependencies couldn't be built
cannot build derivation `/gnu/store/...-baz-2.0.5.drv': 1 dependencies couldn't be built
guix time-machine: error: build of `/gnu/store/...-baz-2.0.5.drv' failed
```
It means that `guix` failed to build a package named `foo`, which was a
dependency of `qux`, `bar`, and `baz`. Importantly, note that the last "failed"
line is not necessarily the root cause, the first "failed" line is.
Most of the time, the build failure is due to a spurious test failure or the
package's build system/test suite breaking when running multi-threaded. To
rebuild _just_ this derivation in a single-threaded fashion (please don't forget
to add other `guix` flags like `--no-substitutes` as appropriate):
```sh
$ guix build --cores=1 /gnu/store/...-foo-3.6.12.drv
```
If the single-threaded rebuild did not succeed, you may need to dig deeper.
You may view `foo`'s build logs in `less` like so (please replace paths with the
path you see in the build failure output):
```sh
$ bzcat /var/log/guix/drvs/../...-foo-3.6.12.drv.bz2 | less
```
`foo`'s build directory is also preserved and available at
`/tmp/guix-build-foo-3.6.12.drv-0`. However, if you fail to build `foo` multiple
times, it may be `/tmp/...drv-1` or `/tmp/...drv-2`. Always consult the build
failure output for the most accurate, up-to-date information.
### python(-minimal): [Errno 84] Invalid or incomplete multibyte or wide character
This error occurs when your `$TMPDIR` (default: /tmp) exists on a filesystem
which rejects characters not present in the UTF-8 character code set. An example
is ZFS with the utf8only=on option set.
More information: https://bugs.python.org/issue37584
### GnuTLS: test-suite FAIL: status-request-revoked
*The derivation is likely identified by: `/gnu/store/vhphki5sg9xkdhh2pbc8gi6vhpfzryf0-gnutls-3.6.12.drv`*
This unfortunate error is most common for non-substitute builders who installed
Guix v1.2.0. The problem stems from the fact that one of GnuTLS's tests uses a
hardcoded certificate which expired on 2020-10-24.
What's more unfortunate is that this GnuTLS derivation is somewhat special in
Guix's dependency graph and is not affected by the package transformation flags
like `--without-tests=`.
The easiest solution for those encountering this problem is to install a newer
version of Guix. However, there are ways to work around this issue:
#### Workaround 1: Using substitutes for this single derivation
If you've authorized the official Guix build farm's key (more info
[here](./README.md#step-1-authorize-the-signing-keys)), then you can use
substitutes just for this single derivation by invoking the following:
```sh
guix build --substitute-urls="https://ci.guix.gnu.org" /gnu/store/vhphki5sg9xkdhh2pbc8gi6vhpfzryf0-gnutls-3.6.12.drv
```
See [this section](./README.md#removing-authorized-keys) for instructions on how
to remove authorized keys if you don't want to keep the build farm's key
authorized.
#### Workaround 2: Temporarily setting the system clock back
This workaround was described [here](https://issues.guix.gnu.org/44559#5).
Basically:
1. Turn off networking
2. Turn off NTP
3. Set system time to 2020-10-01
4. guix build --no-substitutes /gnu/store/vhphki5sg9xkdhh2pbc8gi6vhpfzryf0-gnutls-3.6.12.drv
5. Set system time back to accurate current time
6. Turn NTP back on
7. Turn networking back on
### coreutils: FAIL: tests/tail-2/inotify-dir-recreate
The inotify-dir-create test fails on "remote" filesystems such as overlayfs
(Docker's default filesystem) due to the filesystem being mistakenly recognized
as non-remote.
A relatively easy workaround to this is to make sure that a somewhat traditional
filesystem is mounted at `/tmp` (where `guix-daemon` performs its builds). For
Docker users, this might mean [using a volume][docker/volumes], [binding
mounting][docker/bind-mnt] from host, or (for those with enough RAM and swap)
[mounting a tmpfs][docker/tmpfs] using the `--tmpfs` flag.
Please see the following links for more details:
- An upstream coreutils bug has been filed: [debbugs#47940](https://debbugs.gnu.org/cgi/bugreport.cgi?bug=47940)
- A Guix bug detailing the underlying problem has been filed: [guix-issues#47935](https://issues.guix.gnu.org/47935)
- A commit to skip this test in Guix has been merged into the core-updates branch:
[savannah/guix@6ba1058](https://git.savannah.gnu.org/cgit/guix.git/commit/?id=6ba1058df0c4ce5611c2367531ae5c3cdc729ab4)
[install-script]: #options-1-and-2-using-the-official-shell-installer-script-or-binary-tarball
[install-bin-tarball]: #options-1-and-2-using-the-official-shell-installer-script-or-binary-tarball
[install-fanquake-docker]: #option-3-using-fanquakes-docker-image
[install-distro-pkg]: #option-4-using-a-distribution-maintained-package
[install-source]: #option-5-building-from-source
[fix-argv0]: #creating-and-starting-a-guix-daemon-original-service-with-a-fixed-argv0
[security-model]: ./README.md#choosing-your-security-model
[docker/volumes]: https://docs.docker.com/storage/volumes/
[docker/bind-mnt]: https://docs.docker.com/storage/bind-mounts/
[docker/tmpfs]: https://docs.docker.com/storage/tmpfs/
|
